In this post we shall went through most steps needed to build up Linux images for Raspberry Pi 3B. It is recommended to have a 8GB or larger micro SD card, Raspberry Pi 3B or 3B+, and other peripherals to test the generated kernel image. This tutorial makes part of the Introduction to IIO driver development series of tutorials.
Get a Linux Tree
There are several repositories that contain the source code of the Linux kernel. These repositories are know as trees. Therefore, a Linux tree is a repo where some development for the kernel happens. A Linux tree may be widely known and downloaded (upstream), like Linus’ tree, or may be one that send its contributions (patches) to upstream trees.
Some examples of Linux trees are:
To get a Linux tree repo to start working with, you might use git to download
(clone) it.
For instance, to get the IIO tree one might type:
git clone git://git.kernel.org/pub/scm/linux/kernel/git/jic23/iio.git
For the Raspberry Pi tree:
git clone git@github.com:raspberrypi/linux.git
For the Analog Devices tree:
git clone https://github.com/analogdevicesinc/linux.git
Throughout this series of tutorials, I’ll be using the Analog Devices tree. However, the steps taken here will be much similar to steps needed for working on other Linux trees.
More about Linux trees may be seen on some good articles like “The linux-next and -stable trees” from the LWN.net journal, and/or in great talks like Greg’s “Linux Kernel Development” at Git Merge.
A list of upstream Linux trees can be seen at https://git.kernel.org/.
Configure Compilation Symbols
The Kernel Build System (kbuild) uses the configurations symbols and respective values stored inside a file called “.config”. It is not recommended to edit this file manually unless you know exactly what you’re doing. The configuration options are sensible to ordering. Every entry may have its own dependencies. Disabling an option may limit the visibility of dependent entries. However, if you are wiling to play with .config files, you may specify a different config file setting with the KCONFIG_CONFIG variable, like:
export KCONFIG_CONFIG=.my_config
It may also be set up just when asking kbuild to compile the kernel:
make KCONFIG_CONFIG=.my_config
The kernel configuration symbols are defined in Kconfig files. Most directories inside the kernel source tree have a Kconfig file that includes (source) Kconfig files from its subdirectories. For instance, to add a configuration symbol for the AD7292 driver, the following entry would be added to the Kconfig file at drivers/iio/adc/Kconfig.
config AD7292
	tristate "Analog Devices AD7292 ADC driver"
	depends on SPI
	help
	  Say yes here to build support for Analog Devices AD7292
	  8 Channel ADC with temperature sensor.

	  To compile this driver as a module, choose M here: the
	  module will be called ad7292.
The config keyword defines a new symbol which in turn is presented as a configuration entry in the .config file, within tools like menuconfig and nconfig, or at compilation time. In particular, the AD7292 config symbol has the following attributes:
- tristate: The type for the config option. It tells that this symbol stands for something that may be compiled to be included as a module (m), built in compiled (y), or not compiled at all (n). The type definition also accepts an optional input prompt which is displayed in the config item within tools like menuconfig or nconfig.
- depends on: tells which other config entries this symbol depends on. If its dependencies are not satisfied, this symbol may become non-visible at configuration and/or compilation time. As an experiment, try to disable SPI support at Device Drivers. Note that, as you do so, AD7292 won’t be listed at Device Drivers → Industrial I/O support → Analog to digital converters anymore.
- help: defines a help text to be displayed as auxiliary info.
There are a few ways to prepare a kernel compilation file. It may be done manually, with the aid of tools like menuconfig or nconfig, with a defconfig file. Defconfig files are intended to store only specific non-default values (i.e options we changed for our board or project) for compilation symbols. Some defconfig files for the arm architecture may be found at arch/arm/configs/. Commonly configurations used for Rasbperry Pi boards are stored in the files bcm2709_defconfig, bcm2835_defconfig, and bcmrpi_defconfig. Analog Devices also has a custom defconfig file at their repository (adi_bcm2709_defconfig). To add a custom compilation value for the AD7292 symbol, we would add the following line to adi_bcm2709_defconfig file:
CONFIG_AD7292=y
Comment: bcm comes from Broadcom, manufacturer of the processors used largely on Raspberry Pi boards. See the Raspberry Pi hardware documentation.
We may apply the configurations defined at a defconfig file passing its name as a make rule. Like this:
make adi_bcm2709_defconfig
This will set the values stored in adi_bcm2709_defconfig into the .config file to be used during kernel compilation.
Before compiling the kernel itself, there is one more thing that would be done. Although we have included a new configuration symbol for kernel compilation, we did not bound it to the compilation of the AD7292 driver. The kernel image is build by the kbuild Makefiles. Like the Kconfig files, kbuild Makefiles are present in most kernel directories. From Javier Canillas’ article at the Linux Journal:
“The whole build is done recursively — a top Makefile descends into its subdirectories and executes each subdirectory’s Makefile to generate the binary objects for the files in that directory. Then, these objects are used to generate the modules and the Linux kernel image”.
To have a C file compiled, a build goal has to be added to the Makefile in its directory. For instance, if we wanted our AD7292 driver to be compiled, we would add the following to drivers/iio/adc/Makefile:
obj-$(CONFIG_AD7292) += ad7292.o
Canillas also made a summary of the steps needed to add new kernel functionality:
To add a feature to a Linux kernel (such as the coin driver), you need to do three things:
Put the source file(s) in a place that makes sense, such as drivers/net/wireless for Wi-Fi devices or fs for a new filesystem.
Update the Kconfig for the subdirectory (or subdirectories) where you put the files with config symbols that allow you to choose to include the feature.
Update the Makefile for the subdirectory where you put the files, so the build system can compile your code conditionally.
More about attributes of kconfig symbols, kernel Makefiles, the kbuild system as a whole, can be found at the official documentation for the Kernel Build System. Also available inside the kernel source tree at: Documentation/kbuild/.
A nice thread regarding defconfig usage and its motivation can be found at Stack Overflow.
Instructions on how to configure and build the official Raspberry Pi tree can be found at the Raspberry Pi documentation: Configuring the kernel and Kernel building.
Javier Canillas’ great article explaining the whole kernel compilation process can be found at the Linux Journal.
Kernel Cross Compilation
Different processor architectures usually have different instruction sets and register names. Due to this, using a compiler that produces code for computers which processor belongs to the x86 architecture family (assuming you are programming on such a machine), will generate binaries that won’t work on arm processors. Because of this, we need to use a cross compiler. The cross compiler will use a different compilations process to generate binaries (one that can produce binaries compatible with the arm architecture).
Surely, there are several cross compilers to arm architecture on the Internet however, I’ll be using Linaro’s one (which is a customized GCC). By the time I am writing this tutorial, one of the latest Linaro cross compiling tools is Linaro GCC 7.
After downloaded, you may extract it with tar:
tar -xf gcc-linaro-7.4.1-2019.02-x86_64_arm-linux-gnueabi.tar.xz
To indicate that we want to use a cross compiler, we may set the CROSS_COMPILE
variable to point to the Linaro’s GCC. For instance, if you have extracted it
one directory above the kernel source tree, you might set:
export CROSS_COMPILE=../gcc-linaro-7.4.1-2019.02-x86_64_arm-linux-gnueabi/bin/arm-linux-gnueabi-
As stated in the documentation:
By default, the top Makefile sets $(ARCH) to be the same as the host system architecture. For a cross build, a user may override the value of $(ARCH) on the command line: make ARCH=m68k …
So, we need to specify the target architecture we want binaries be generated
for. This is done by setting the ARCH variable. In our case:
export ARCH=arm
Note: All these variables can be set just before compilation, on the command line:
make ARCH=arm export CROSS_COMPILE=../gcc-linaro-7.4.1-2019.02-x86_64_arm-linux-gnueabi/bin/arm-linux-gnueabi-
That’s a pretty long command in my opinion. This is the reason why I prefer to
export the values for the variables in separate commands, instead of preparing
a giant one that may be not as much readable. Though, each one decides what
works best for themselves, from now on, I will assume the ARCH and
CROSS_COMPILE variables are exported.
Now, when kbuild start compiling the Linux kernel files, it will use the cross compiler set to do so.
Finally, we are ready to compile the Linux kernel to be use in our Raspberry Pi. =D
Type:
make zImage modules dtbs -j4
Cross your fingers, press Enter and go fetch a mug of coffee or any drink you
like. The compilation process might take some time (around half an hour in my
quad core machine). If you’ve got more than 4 cores in your machine, you may put
them to work increasing the number of threads used by the kbuild. This is done
by setting the j flag. For instance, if you want the compilation process to be
carried on with 8 threads, you may use -j8. The dtbs rule makes kbuild to
compile the device tree files at arch/arm/boot/dts into device tree blobs to
be used during system boot. The modules rule indicates to build code that is
marked as modules (m) (duhh). The zImage refers to architecture specific kind
of image we want to be generated. Different form the default vmlinux image,
the zImage is a compressed kernel image.
If everything goes well, the last output lines should look like this:
  LD      arch/arm/boot/compressed/vmlinux
  OBJCOPY arch/arm/boot/zImage
  Kernel: arch/arm/boot/zImage is ready
The compilation will create (or overwrite) the following files:
arch/arm/boot/zImage: the kernel imagemodules.order,modules.builtin, andmodules.builtin.modinfo: holding information about which modules are built into the kernel.arch/arm/boot/dts/*.dtb: device tree blob files. These files describe board hardware in a compact way.arch/arm/boot/dts/overlays/*.dtbo: device tree overlay blobs. These are used to extend device tree hardware description.
That’s it. Congratulations, you’ve compiled the Linux kernel for Raspberry Pi! =D
If you got any trouble through this process, you might find additional references and tips at:
There’s also a nice introductory cross compiling video class from Mateus Castello, if you can understand portuguese.
Now I’ll go through the steps for testing the compiled kernel.
Install an Operating System: Burn a Raspbian SD card
To properly test our newly compiled kernel image, I recommend to prepare a micro SD card with Raspbian. Also, once Graphical User Interface (GUI) will not be needed, I would recommend to use the Raspbian Lite version.
The official installation guide is very intuitive and comprehensive. Therefore, I will give no further explanation about it.
Prepare The SD Card
Once you have flashed a Raspbian image to a SD card there should be two
partitions within it: boot and rootfs. Some OS automatically mount the
partitions present on SD cards when they are inserted. You may use those mount
points to copy files in and out of the card. If you got no mount points, the
device and partitions to be mounted may be found with fdisk:
sudo fdisk -l
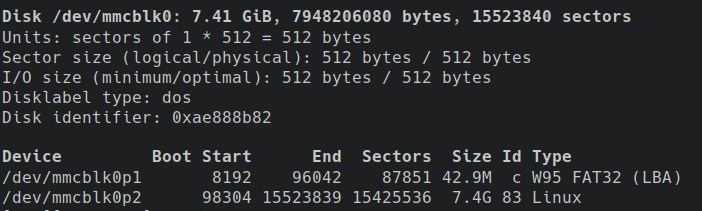
The boot partition is around 50 megabytes size and is FAT32 formatted (at
/dev/mmcblk0p1 in my case). It contains device tree blob files, overlays, the
Linux kernel image, and configuration files needed to boot the system. The
rootfs partition uses the rest of the SD card storage and has a Linux
compatible file system (at /dev/mmcblk0p2). It contains the filesystem for
the Raspbian operating system.
You may mount these partition to be able to copy the files. For instance:
sudo mkdir /mnt/rpi-boot
sudo mkdir /mnt/rpi-rootfs
sudo mount /dev/mmcblk0p1 /mnt/rpi-boot
sudo mount /dev/mmcblk0p2 /mnt/rpi-rootfs
Before we proceed, it is recommended to backup the current kernel image in case of any trouble.
sudo cp /mnt/rpi-boot/kernel7.img ~/
Then, to test our generated Linux image, we need to copy it to the boot partition and name the image in such a way that it gets selected for the next boot. From the Linux root directory where the kernel was compiled you might type:
sudo cp arch/arm/boot/zImage /mnt/rpi-boot/kernel7.img
Note: kernel7.img is the default kernel filename on Pi 2 and Pi 3. On Pi 1 and Pi Zero it is kernel.img.
Note 2: The Linux image name may be set on the config.txt file in the boot
partition. To boot with a custom image name you may add kernel=<kernel file
name> to it. For instance: echo kernel=my_kernel.img >>
/mnt/rpi-boot/config.txt. See the Raspberry Pi boot
options
for more details.
The same idea applies to the device tree files. We may backup them:
mkdir ~/rpi-dtb-files
sudo cp /mnt/rpi-boot/*.dtb ~/rpi-dtb-files
Then copy the compiled dtb files in:
sudo cp arch/arm/boot/dts/*.dtb /mnt/rpi-boot/
sudo cp arch/arm/boot/dts/overlays/*.dtbo /mnt/rpi-boot/overlays/
To install the kernel modules, do:
sudo make INSTALL_MOD_PATH=/mnt/rpi-rootfs modules_install
Synchronize and umount the partitions to ensure data will persist on them:
rsync /mnt/rpi-boot
rsync /mnt/rpi-rootfs
sudo umount /mnt/rpi-boot
sudo umount /mnt/rpi-rootfs
For additional references on Raspberry Pi boot configurations, see the config-txt documentation.
We’re now ready to take the SD card out from the computer, attach it to the Raspberry Pi, and power the Pi on.
Test The Kernel Image
That’s the hour of truth. Attach the SD card to the Pi along with any peripherals you want (monitor, keyboard, etc.) so to be able to see what’s happening. Alternative ways of seeing what’s happening on the Raspberry Pi I’ve explored may be seen on this tutorial.
Power on and wait it to (hopefully) boot. If boot process completes normally, you may get a terminal to login. Once logged in, you may check the kernel version being used:
uname -r
That should have the same version number than the one at the Makefile in the
base directory of the kernel you’ve compiled. Its should follow the format
VERSION.PATCHLEVEL.SUBLEVEL
You may also see the installed modules at /lib/modules/<kernel version>. For
instance, to see the installed IIO modules for kernel version 4.14.50-v7+ you
may look for them:
ls /lib/modules/4.14.50-v7+/kernel/drivers/iio/
That’s it! You have successfully downloaded, configured, compiled, and tested a Linux kernel for Raspberry Pi. Congratulations!!!
—————————————————— —————————————————— ——————————————————
Revision History:
- Rev1 (2019-09-03): Release
- Rev2 (2019-09-19): Spelling corrections